Now that we've built our form, it's time to make our form do work. There are generally two types of forms in Angular: template driven forms and reactive forms. We will be focusing on template driven forms. I may throw a lesson on reactive forms later.
First, make sure that you import FormsModule in your room.module.ts. This gives all the components in the room module access to the neat form stuff we'll be doing. You do not need to import it in the componentm just the module will do.
Let's kick things off by attaching a selector in our HTML to ngForm. This will look a little weird at first, but your form tag should look like this:
<form #roomForm="ngForm" class="room-form">
This creates a selector in our HTML. I know you've seen that term before: In our components, the selector is how we refer to a particular component from the HTML. This works in a similary fashion, we can now refer to the form in the HTML using the selector roomForm.
That's nice, but what does this ngForm actually give us? Let's find out. In your room-form.component.ts file, add two things to your @angular/core import: ViewChild and OnInit.
OnInit you've seen before, but what is ViewChild? Using ViewChild will allow us to grab an element from the DOM that has a selector. We just created a selector, so that's perfect. This is often used in conjuction with child components, but we haven't gotten too much into that yet.
So how do we use ViewChild? It goes inside your ts along with your variable declarations. I've included some variables that we will be using later as well:
public roomName: string;
public options: string[];
@ViewChild('roomForm') private _roomForm: NgForm;
roomName will hold the name of the room that we are on. I'm going to leave that to you, we covered how to do that in the past few lessons. (Hint: Look in the params). The options array will hold the options for our Reasons dropdown.
The real meat is the ViewChild line: It selects the item on the DOM that has the selector roomForm. We gave our form tag that selector, so now we can refer to that form in our TS with the variable _roomForm. It's almost like a fancy getElementById.
Now implement OnInit, and inside your ngOnInit, lets console.log this._roomForm. Thanks to our ViewChild, we know that refers to our form, so lets see what we got:
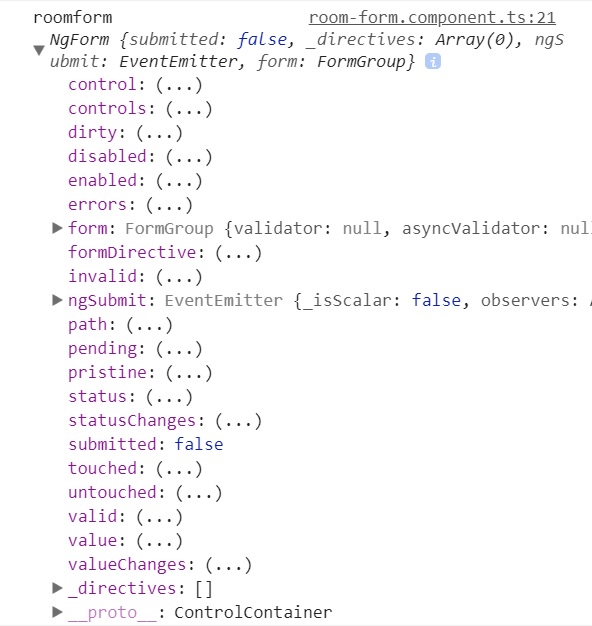
Look at all that stuff! We can check to see if our form is dirty (i.e. has anything been input) or pristine (opposite of dirty), whether or not our form is valid or invalid, and a whole bunch of other cool things. We'll be working mostly with the valid property, but after this lesson you should be able to get creative with some of these things.
But something is missing: Our values. If you click on the value part of our console log, you'll notice that we arent getting the values of the form. That's because we need to implement a directive you saw in our first exercise: ngModel.
Normally, we would declare our ngModel directive using the bracket combination of [()] and we would give it a name. We could then match up that name with a variable that we declare in our typescript. But we don't need to do all of that. ngModel performs a two-way binding between a variable of our choosing and the value of the element. But what happens if we don't declare a variable name and simply put ngModel?
We wouldn't have a variable in our TS to refer to whatever element we threw that ngModel on. That would seem bad, but as we just saw, we already have a method to call the values of the form, and that is...
Uhh... _roomForm.value?
That's correct! Because we will be handling our data with our ngForm methods, assign each field to it's own variable becomes redundant. But there's a catch that we will get to later. For now, lets tack on a submit method. We won't actually do any submitting to the database yet, we just want to see our values. Lets add the following to our form tag:
This tells our form that when we submit, execute the method submitForm and pass in our form values. We Will need to create that method in our TS file:
public submitForm(value) {
console.log('form values:', value);
}
Now try typing in some values into the form and click the submit button. You should start to see values in your console.log! But I bet you have questions.
How does it know the names of the fields?
The name of the field is taken from the name attribute in each input element. In ou.r case, we gve the email field an attribute name and set that equal to "email". That's where it gets the property name from.
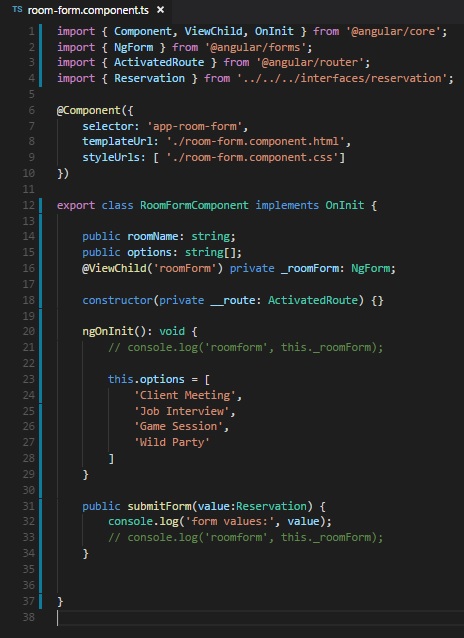
This leads to another important point, the catch I mentioned earlier: We want this form to fit our reservation interface. This means that the attributes in our name field must match the property names in our reservation interface. For this reason, you should make sure in your submit method that you give the values a type Reservation.
public submitForm(value:Reservation) {
console.log('form values:', value);
}
It's definitely worth mentioning that if your names don't mat up with your interface, you will not get an immediate error on the linter, you won't find out until you go to write to your database. For this reason, make sure your names match up, and make sure in your console.log that you are getting every field required for your interface.
We're getting our values now, so technically we have enough to complete our form, but that's no fun. Let's get some validation going.
We can use some HTML 5 attributes to add some validation for us. First thing would be to throw a novalidate inside our form like so:
This may seem counter-intuitive, but what we're doing her is telling the browser that we are going to handle our own validation consequences. This does not disable the effect HTML5 attributes have on tags. And were going to use one of them: required.
Before we start applying the tags, we're going to need to see our ngForm information upon submitting so we can troubleshoot our form. Copy the console.log that you previously had into your OnInit into your submit method. Now when we click the submit button, we should actually get two console logs. Our ngForm info and the values of our form. Open up that ngForm console log and try clicking on our valid and invalid children. (If you did not know, you can click on the (...) in the console logs and actually see the result. That's what we are doing now).
So an empty form return a valid value of true. We don't want that. Now try adding required inside the input tags for the email. Save and take a look at our valid method from the ngForm: Our form is no longer valid! Yay!
Adding required to an input tag means that failure to put anything inside the input tag causes the form to not be valid. We can now utilize one of our warning p tags underneath the form!
Find the p tag that says "You have fields that need to be filled out". We're going to add an *ngIf to this tag making it look like this:
<p *ngIf="roomForm.invalid">You have fields that need to be filled out</p>
Don't forget that the #roomForm in the form tag is what is enabling us to call roomForm.invalid this way. But the end result is neat: As long as there is an empty field, there will be a warning that says they need to fill fields out.
This is great, but right now we're only looking at the condition of our entire form. Is there a way we can check the condition of one particular field? There sure is.
Let's go back to the console.log for our NgForm. You should notice one property called controls. Take a look.
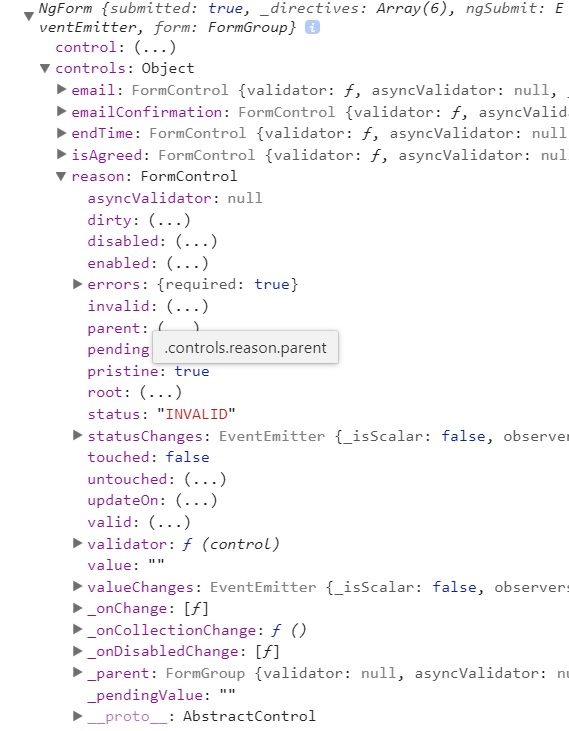
Clicking on controls gives us an object. That object contains each of our fields, and inside each of those fields.... is our own set of properties like valid and pristine! Super, that's just what we want. (ngFormName).controls allows you to have all the options for an ngForm for each field in your form.
We created an array called options that will hold the... options... for our drop down. Let's build that array inside our ngOnInit. Don't worry, this one will be super simple:
this.options = [ 'Performance Review', 'Job Meeting', 'Game Session', 'Client Meeting' ];
You can put whatever you like for your options. Now we want to use *ngFor to loop over these options. It's been a while since we went over *ngFor, feel free to review if you like. Here's a look at the select/option part of our HTML that holds our reasons.
<select name="reason" ngModel required>
<option *ngFor="let reason of options" (value)="reason"><option>
<select>
We used a loop to create our reason list. don't forget the (value) part. The reason we use the parentheses () instead of simply using a value attribute is because the parentheses allows us to use variable names.
Our dropdown should be set, but we want to have a warning if they havent selected an item. There is a p tag underneath that will contain our warning, we just have to attack an ngIf. Now that we have our controls, we know what the condition will be:
<p *ngIf="roomForm.controls.reason?.invalid">You need to select something</p>
We added the question mark to reason because it's entirely possible that the reason field is empty. Now the p tag should show up if we don't have an option selected, which is great. If it's not working, make sure you have the required attribute on your select tag along with an ngModel.
Warning tags are neat, but maybe something a little more subtle like a shadow would be nice. Do you remember how we applied a class conditionally in the card picker exercise? One was ngStyle, but that's not what we're looking for. Instead...
Let's use ngClass instead. Let's try applying a different color shadow to our email field depending on whether or not the user entered a valid email.
Our first step should be to use the HTML5 email attribute the same way we applied the required attribute in our input tag:
<input name="email" type="email" placeholder="email" ngModel required email>
This email attribute will cause the field to read as not valid in our controls if they don't input a valid email. Now we need to create our two classes for the shadows in our css. Here are the classes in my room form css file:
.danger {
box-shadow: 0px 0px 10px #f00;
}
.valid {
box-shadow: 0px 0px 10px #0f0;
}
Now we have our two classes for our shadows, danger for a red shadow and valid for a green shadow. Now we need to apply them conditionally, but what is our condition? We know that because we put the email attribute that the input field will not be valid if the email is not a legit email, so we can just use our roomForm controls to apply our classes:
<input name="email" type="email" placeholder="email" ngModel required email [ngClass]="{danger: roomForm.controls.email?.invalid, valid: roomForm.controls.email?.valid}" >
Get a good look at the syntax: ngClass takes in an object. Each property of the object is the name of the class you want to apply conditionally, the value of the property is the condition for that respective class. If the condition is true, the class is applied, if it is false, it is not.
Thanks to our ngModel, this now happens dynamically. As soon as someone enters in a valid email address, the shadow will change from red to green. If you start to delete from that field to make it invalid, it goes back to red!
[ngClass]="{
classname: condition to apply classname,
classname2: condition to apply classname2
}"
ngClass is an excellent way to apply css effects quite easily based on value of your variables. Try to apply it in as many ways as you can throughout your site, not just on the form.
Once that is working, apply the same thing to your email confirmation field.
One last thing we can do here, let's disable our submit button if our form is invalid. This way no one can submit data that doesn't conform to our interface. We have experience in using this from both the exercises in class using [disabled]. Here's how my submit button looks after the change:
<input class="btn btn-info" type="submit" [disabled]="roomForm.invalid">
What [disabled] does is disable the element if the condition inside the quotes is true. In our case, if roomForm.invalid is true, our button is disabled, which is our goal.
With that, our form work is done. Here's a final look at my HTML and TS files:

Again, mine is super basic, with no styles. Try to personalize the form a bit by giving some nice styles.
Let's stop for now, in the next lesson we'll cover adding and deleting reervations to give our app full functionality. Almost done!